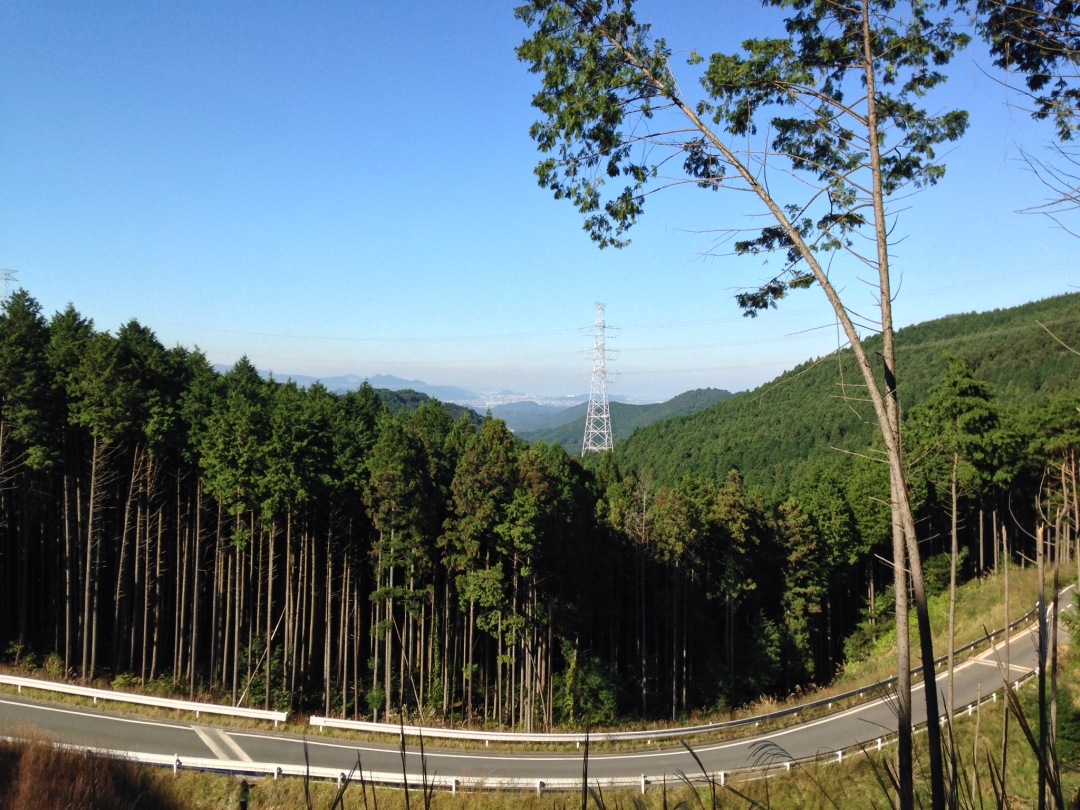
Wiling away time at work I’d come across a forest road in the neighbouring Chikuho District that looked as if it would give some decent views back across the local countryside so spent the week planning and re-planning a route to take it in.
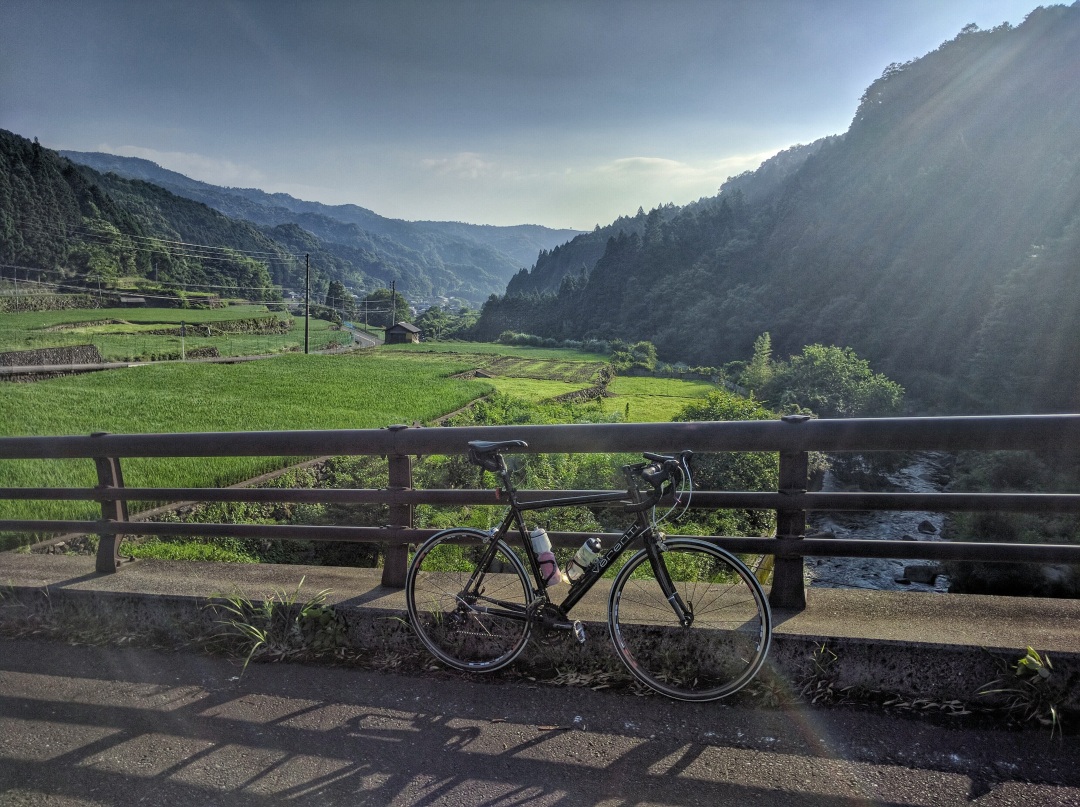
I wasn’t sure what state some of the roads were going to be in so I wanted it to be light before I hit the new roads. At 5.30 on Saturday morning, the skies were clear and it was a few degrees below zero when I set off into the darkness, but it wasn’t long before the first glow of twilight started to brighten the sky. The long, shallow climb up to Genjinomori got me nicely warmed up, and as I got down into Oto it was just getting light.
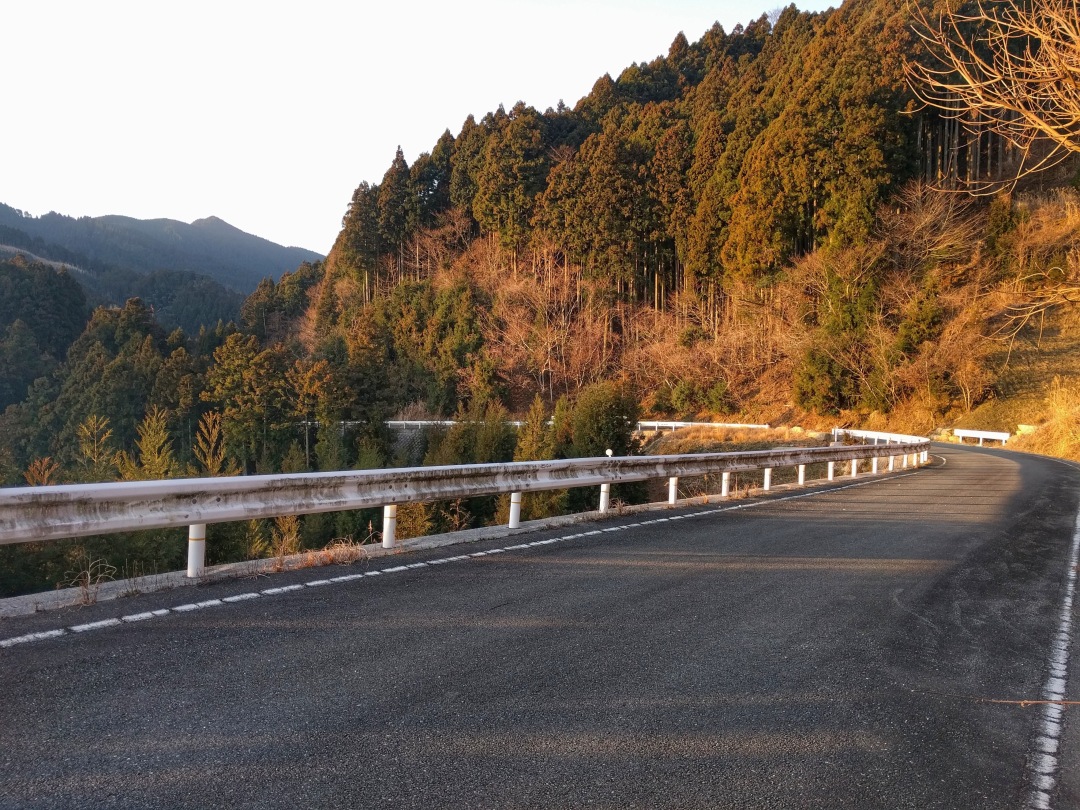
It was up and over two valley ridges to the bottom of the main climb for the day. The first part of the climb was up through terraced farmland, and what had seemed like a good idea sitting in the office was feeling like much less of one as I trundled up the narrow valley and saw a wall of hills ahead. As ever with cycling, all it took was a teasing glimpse of the road I was heading for bathed in morning sun for me to remember why I’d come out here. Then, further up the valley there were a few switchbacks which allowed me to take in the countryside I’d just come from.
Looking back down the valley
More encouragement arrived in the form of a sign for only 2 kilometres to the orchard near the high point of the road, and I was taking a slightly shorter if steeper way up. Lovely!
That thought lasted a few seconds.
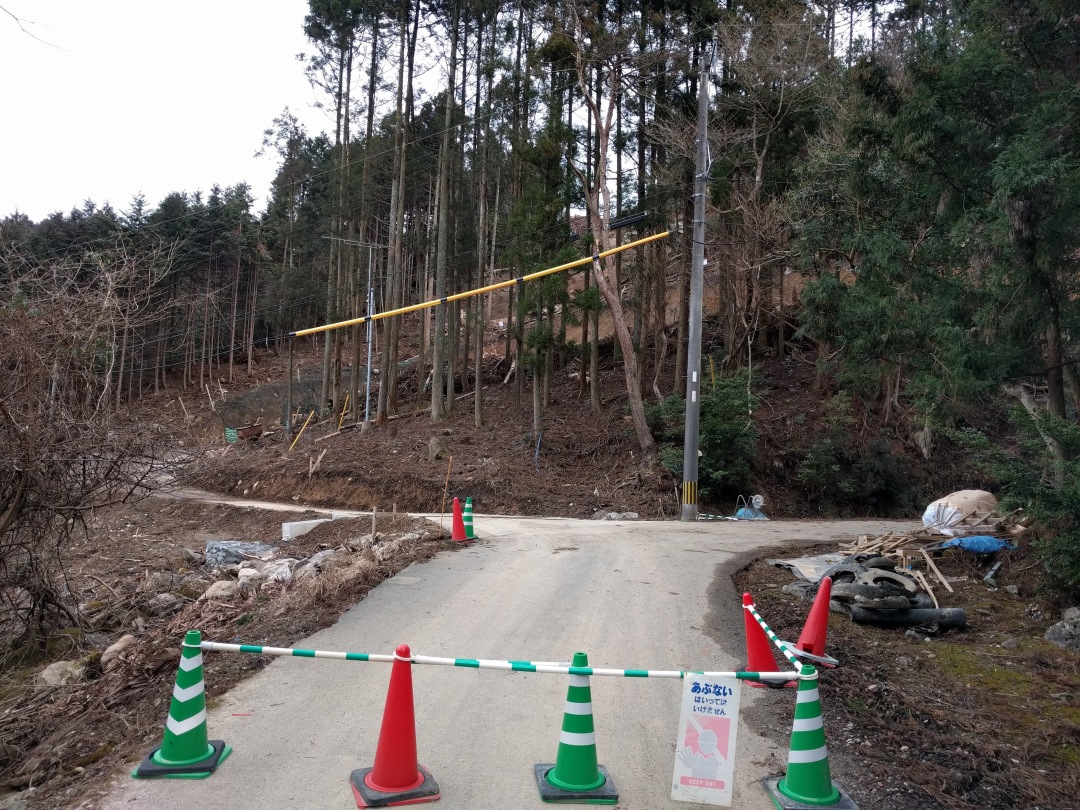
Google street view from three years ago showed three road cones “blocking” the entrance to the climb, and they were still there along with a plastic barrier, well, they were in smithereens across the road, something far bigger than a bike having taken umbrage at their presence. Straight away it became apparent that this road was falling into a state of disrepair and I was in two minds whether to turn back and go up the other way. But it wasn’t as steep as I had imagined so I decided to plough on.
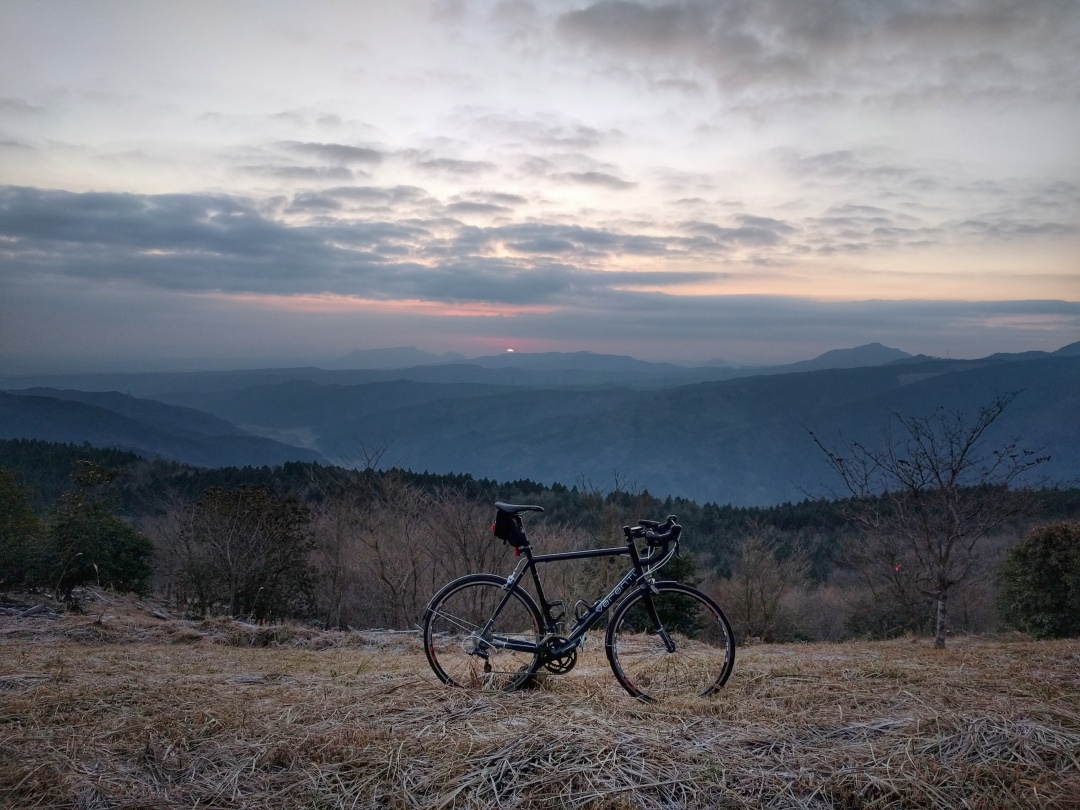
At the top of the climb it was back onto the main forest road, past the orchard, over a few rolling hills, avoiding a few startled deer and pheasants, and I was out onto the section of road I’d seen on the way up, stopping for a few minutes to take in the views and bask in the morning sun.
The view I came forToyagatake RindoLooking back over Chikuho
On the way down I had planned to take the old road down, but once I hit it, I had second thoughts. The road turned out to be leaf-covered loose gravel with steep narrow bends, so I decided discretion is the better part of valour and turned back. The main road down had its moments but I got back down to Route 67, albeit the other side of a golf course from where I’d planned. Now it was time for a bit of on-the-fly route planning and a sun-in-the face 20 kilometres home.
With the weather getting milder and the mornings getting a bit lighter, it was time to get back into early morning rides and the bigger hills this weekend. Until two weeks ago there was still quite a lot of snow and ice on the higher passes, which isn’t necessarily too bad when it’s light, but certainly not any fun in the dark. As such I’ve tended to go out in the afternoon but that gives me two hours max out the house.
Spring was definitely in the air at the end of last week, though, so I dragged myself out of bed at 4.30 on Sunday morning with the aim of being on the road by 5.00 and back at 8 for breakfast. The weather forecast had been for cloud, but it was clear and 3°c when I finally got out the door at quarter past five, so I was expecting it to be a bit fresh on the descents.
It was still pitch black as I made way along Route 238 to Route 237, which would take me up to the Mt Kubote climb. Once onto Route 237 it’s a steady 14-kilometre climb up to 253 metres, although a headwind made it heavier going .
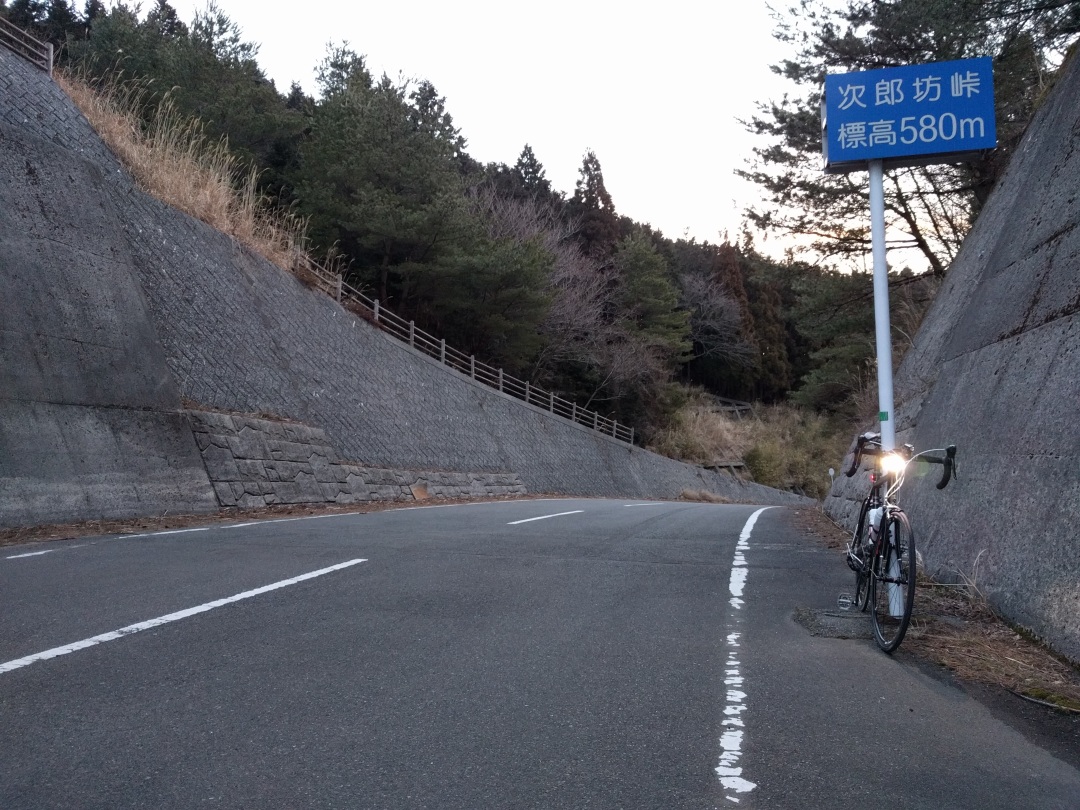
I got to the junction with Route 32, and the main climb of the day, just as it was starting to get light – prefect timing. From this side, it’s a Cat 3 climb (5.2km @ 6%) up to the Jirobo Pass on the shoulder of Mt Kubote.
The first 1.8 kilometres are an older, one and a half lane road, but the upper part is a superb two-lane highway of cuttings and bridges that was only finished in 2008 at a cost of 4,700,000,000 yen (£33.5 million). The road is apparently a big favourite with motorcyclists and there is a lot of rubber on some of the bends but I’ve ever come across any traffic whatsoever. The climb has number markers on each bend to help you gauge your (lack of) progress. Climbing from this side, there are 28 bends, from the Buzen side, there are 17.
Looking back down the climb in December last year.
Once you’re on the new section, the mountain is on the right and there are some great views out over the valley to your left, especially this time of year when most of the grass has died back. The last time I climbed from this side was in July and at the same time of day it was about 25°c and 90% humidity – needless to say, it was easier in the cold.
The top of the Jirobo Pass is a bit of a disappointment in that there’s not much of a view and there’s a bridge (carrying a footpath) over the top of it, so I never really feel like I’ve completed the climb unless I go up that, too.
Jirobo Pass – the footpath up to the bridge is on the left.Between the clouds – bridge over the Jirobo Pass, May 2016
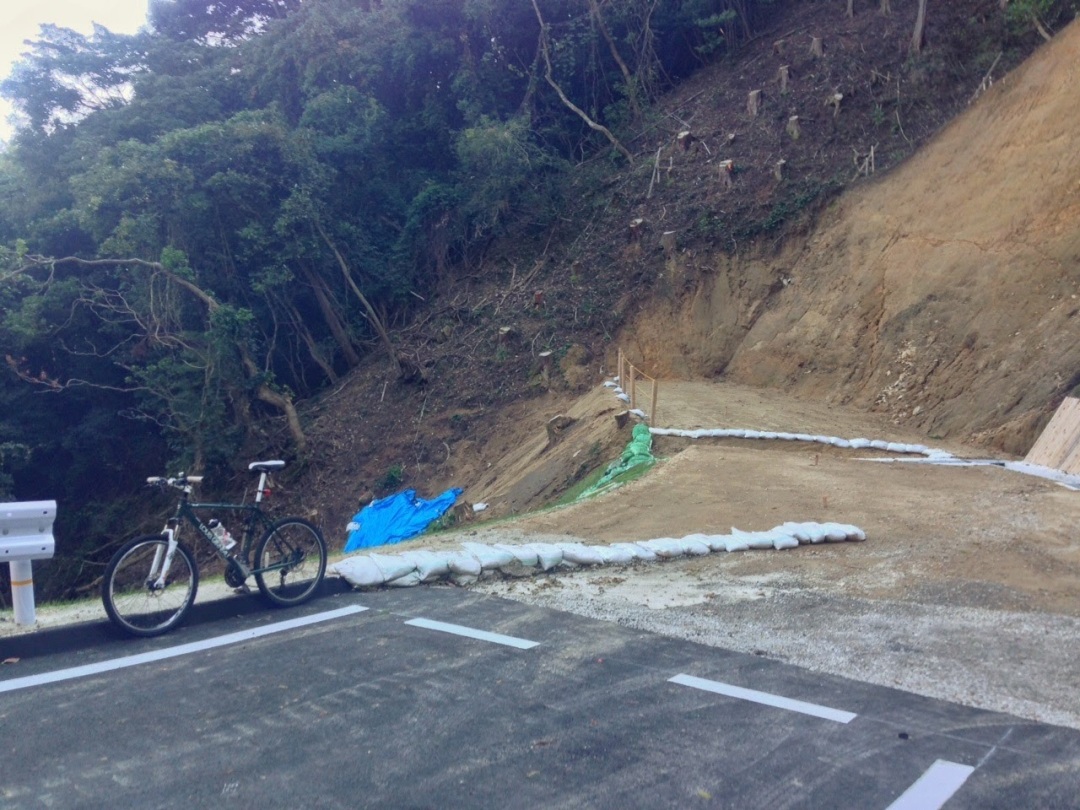
The last couple of times I’ve been up here, they have been work on a new forest road just next to the pass and I think it had been due for completion at the end of February. The notice there this time has this section due to be finished next week, and it looks like it will eventually join up, via Mt Kunimi, with the section I came across last week – should be a great road when it’s finished.
The new forest road to Mt Kunimi
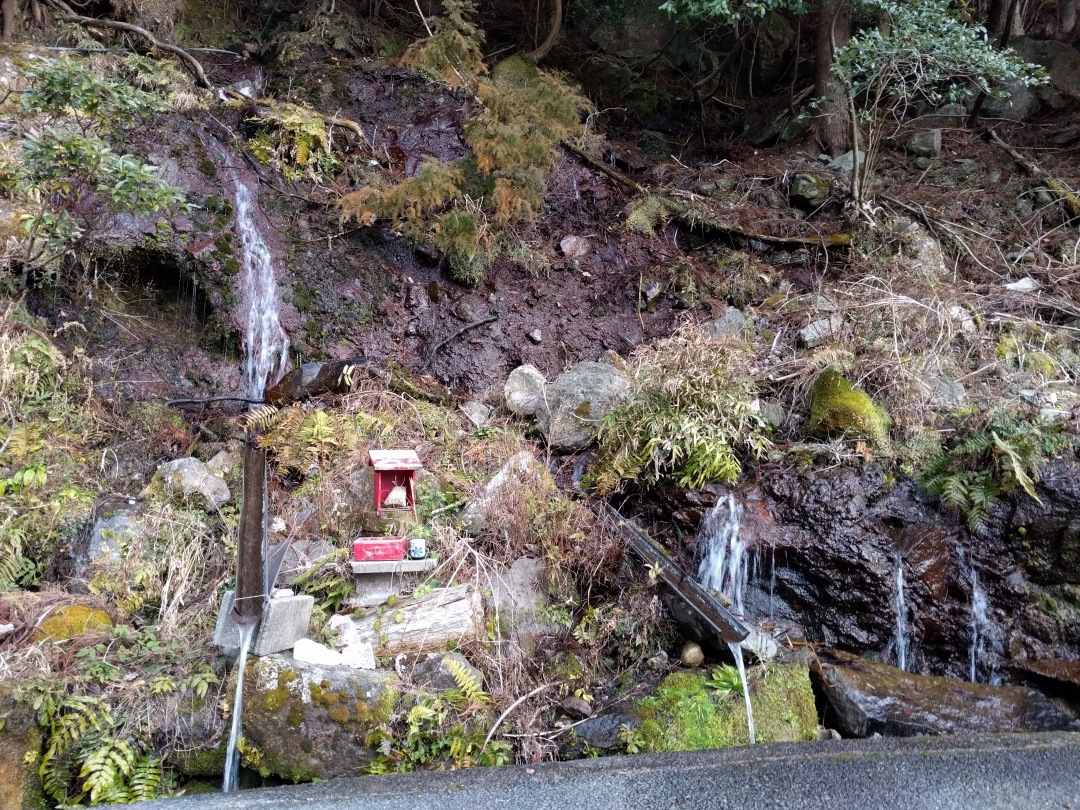
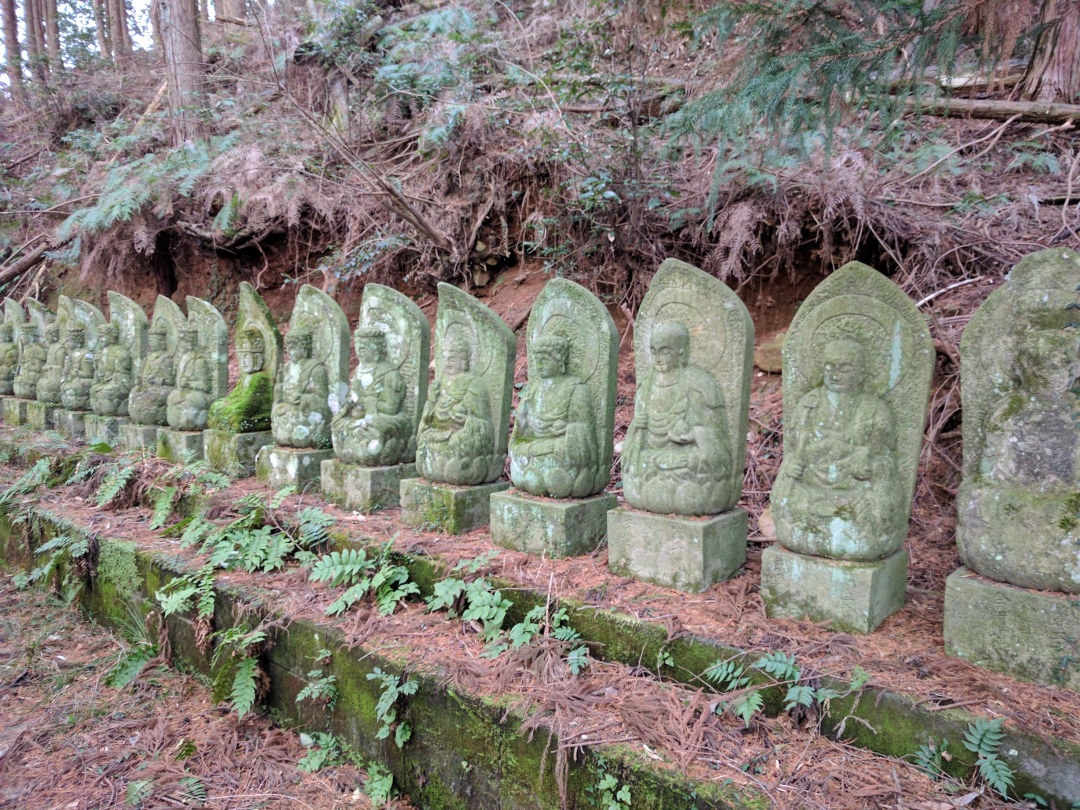
Similar to the way up from Chikujo, the top part of the road down to Buzen is quite new, but it’s much narrower most of the the way down. Generally I prefer climbing the Buzen side and going down the Chikujo side just because you can really let go on the top part of the descent. As you get down to bend 4 on the Buzen side you get to the first of the 500 stone monks which are scattered over Mt Kubote. On Sunday I had the added bonus of a spectacular sunrise over the ridge of the valley, but you can’t really spend too long admiring the view as you’ve got to be ready to take evasive action from suicidal / homicidal deer. Two kilometres down from the pass there’s a junction marked by a gaggle of stone monks and a number of small water falls and springs.
Stone Monks
Free spring water
From there it’s another two mainly straight kilometres down to the valley. On Sunday I came across five groups of deer on that section alone, but fortunately they headed back up into the trees rather than zigzag across the road. The valley at the bottom of the climb is a designated cultural landscape, and its beautifully maintained stone walls are a refreshing change from the concrete that covers much of the rest of the Japanese countryside.
For cyclists its a paradise; it’s 8 traffic light-free kilometres down the valley at -3% or there is a 29 kilometre long forest road that climbs up and over one side of the valley, and two forest roads leading off over the other side. If you see a car on any of these roads you’ve been unlucky. There’s also an older road leading back up to the junction and on Sunday I decided to revisit that climb.
The climb (1.2km @12%) goes up through a small citrus orchard and then it’s into the forest and a section of switchbacks with each corner watched over by stone monks, before a long straight with a sharp drop-off on the left up to the junction. The road is narrow all the way and once into the forest there’s a lot of debris on the road. It’s a proper grind but satisfying when you get to the top. I was glad I was going straight back down rather than back up to the pass, and made sure I didn’t make the same mistake as last time when I almost lost it on one of the corners.
Base of the climb – May 2016The valley is a designated cultural landscape – May 2016The citrus orchard complete with traditional stone wallsStone monks watching over the cornerOne of the switchbacks – not pleasant in the wet
This was helped by not being able to clip in with my left shoe, leaving me ready to stick a leg out if necessary. I’d never had trouble clipping in before and thought it was down to new shoes. Alas, it was down to me not re-tightening the the bolts after their maiden ride last week, so the left cleat was stuck in the pedal. Luckily they were SPD shoes and one-sided pedals so I could still ride relatively normally, although I did find my foot slipping off the outside of the pedal a few times.
My original plan had been to go back via one of the forest roads, but being a bit tight on time and not fancying doing too much more climbing only half clipped-in, I took the longer but flatter route back. So it was a fast (for me) wind-assisted descent down the valley and then onto the Keichiku Agri Line.
Route 32 – June 2016
From Route 32 back to the house there are something like 19 valleys to cross. The Agri Line climbs over some of the ridges and tunnels through others. With most of the ridges about 80 -100 metres it’s not exactly flat but the climbs are mostly only about 1km long. I decided to skip the last couple of climbs and opted instead for the main road which runs between the valleys and the coast. I’ve always avoided that road in the past but it was still before 8 on a Sunday morning so the traffic wasn’t heavy and the traffic light gods were with me, so it was a welcome change. Now I’ve just got to try and get that cleat out of the pedal!
One of the beauties of the Keichiku area is the sheer number of roads to climb. With a two-hour window for a ride on Sunday afternoon, I thought I’d see what this climb had to offer. I’d not bothered with this road before because there’s a longer climb in the next valley, and this road ends at a lodge which closed down a year or so ago.
The lodge in question is the somewhat questionably named Villa Paradis. It was built in 1994, refurbished in 2007, and joined the camp site in the next valley on the Chikojo Town white elephant list at the end of 2015. As far as I know, the lodge was built as a retreat for school trips and the road signs leading up to it bill it as the slightly disturbing in a Jimmy Savile sort of way”Touching Forest Institution”.
The climb itself is, unsurprisingly, a shorter version of the climb up Route 231 to Mt Kunimi that goes up the next valley. The first few kilometres run at about 3% to 4%. After you cross the Agri Line the valley starts to narrow and the gradient increases to about 5%. With 1.9 kilometres to go, you cross a forest road* and the real climb begins. The next 900 metres or so are about 8% then you’re into woodland and the road ramps up to 15%+ through some tight bends for the next 400 metres.
The road is singe track but you don’t have to worry about traffic so you can pick the easiest line on the bends. With 500 metres to go you come out of a switchback to a nice bit of flat to get your breath back. The road comes out into a clearing for the final pair of switchbacks up to the lodge.
A chance for a breather
The road winds round the back of the lodge and continues on as a trail up to Mt Kunimi.
Mt Kunimi this way
Not having wasted enough money on a lodge that no one uses, they’re now building a new road up in to the surrounding forest – keep it coming, I say!
* Just in case the other 3 roads that link the valleys weren’t enough, there’s a beautifully built 34 kilometre forest road winding up and over all of the ridges.
A climb up a new forest road in Saigawa. Max elevation – 400 metres. Distance – 8.2 km.
Kuramoteyama is one of a number of “sacred” mountains in the Keichiku area – Kuboteyama, and Hikosan being the other main ones (that I know about). The temples and the trails that lead up to them date back almost 1000 years. As far as I know, the attraction of these mountains to Heian era Japanese was their isolation, and that remains the attraction for me. But whereas they were looking to become one with nature, I’m after quiet roads with nice views. Thankfully, the nature of local politics in Japan means that the mountains are crisscrossed by an ever-growing network of forest roads (rindo) – many of which are beautifully tarmaced and rarely used, and the road up around Kuromoteyama is a prime example.
The first time I cycled up this road it finished abruptly with a white line the beginnings of a cutting. It’s only 20 minutes from the house and it’s a good workout – 3.8 kilometres at 8% – so I would go up it every now and then.
End of the road – October 2014
Approaching from the other end, the road ended at a couple of unfinished bridges. I think I went along that way twice, just to see what was there.
Bridges under construction
June 2015
Finally (I say finally but it’s only taken two years for them to build the missing kilometre and it’s not as if there is any pressing need for the road), this autumn, the road was officially opened, and it now opens up some nice route options.
To get to the climb you turn off Route 239 and head along a wide valley for a kilometre and a half. The turn for the climb is at the signpost for pilgrim trail.
It’s a gentle climb up past a temple, then there’s a steep ramp up into the forest. The road is single track and the trees are tight to the sides of the road. It’s dark and there’s a lot of litterfall on the road all year round.
The gradient levels off after the first five hundred metres or so, and the road winds along the contour of the mountain until it meets the river. The road climbs at about 8% to 10% for about a kilometre along the right-hand side of the valley with a sharp drop-off to the left and a stone embankment on the right, so you’re always on the lookout for any trucks or wildlife coming down.
Going up along the river
The same day, a few hundred metres along the road, but it looks like a different season.
The trees on the left make way for some abandoned rice fields and the road levels off as it meets up with an alternative road up coming in from the right.
The road you were on carries straight on along the river but to get to the top you turn left onto the newer road. This road is a bit wider and steeper but there’s a lot less debris on the road. The only thing you have to watch out for are the drainage grids that cut across the width of road at regular intervals and always, it seems, coming into or out of a bend.
Watch out for grids.
The road twists, then it twists some more, and then it twists again. And again until eventually you see to a cutting taking you round to other side of the mountain. You get out the saddle and push for top, only to find you’re not there yet.
After 400 metres you come to a false summit (where the road ended the first time I rode up). Now is the good bit. There’s still a bit of climbing to do, but it’s a fantastic 2 kilometres of twisting, rolling road. Get a nice bit of speed up going down, hit a climb, get out of the saddle and fly over the top (well, get to the top slightly less than a wheezing slightly less than usual). The only catch is the urge to stop and take a photo. Give in to temptation and you’re back in the lowest gear grinding it out to the top of the next lump.
New tarmac
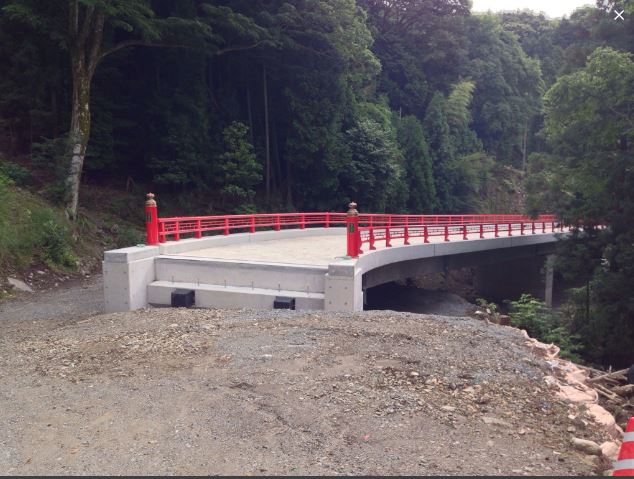
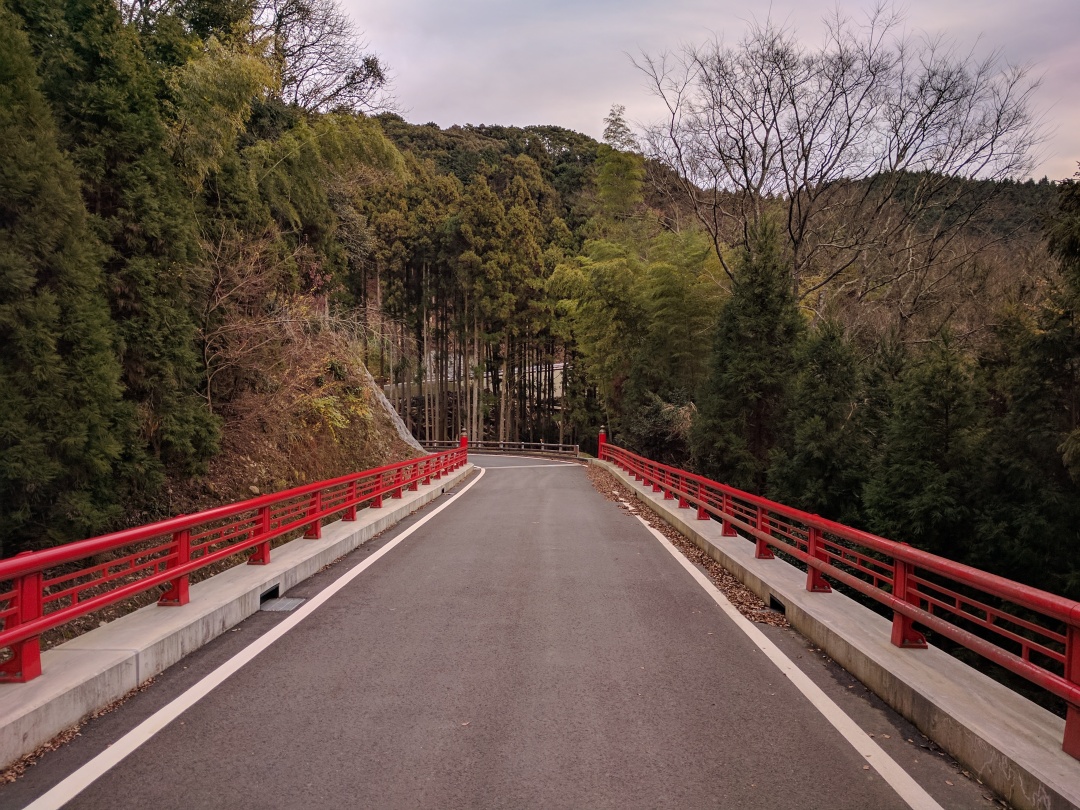
Just before the highest point, you go across a pair of red bridges which take you over one of the old pilgrim roads.
Stone path and tori gate
Ornamental Bridge
After the bridges there’s one more short climb and then you get to the highest point on the road. You’re then back on to an older section of road as you come down through the forest towards Route 241. It’s the usual narrow twisty road with a good chance of coming across deer or boar, so your brakes get a decent workout. Just before you get to the end of the road, there’s a decent spot for view over towards Hiraodai and Ryugahana.
There’s one final tight left-hander and you cross the river and reach Route 241. Turn right for a flying downhill (3.4 kilometres at -7%) or turn left for the climb up to Kotsutoidake (2.3 kilometres at 8.7%) and another network of forest roads .
This climb loops up from Route 64 through the hamlet of Tokakuji. Max Elevation – 300m
You can climb this from the east or west; from the west it’s 2.6 kilometres at an average of 10.6%, from the east it’s 3.5 kilometres at 7.8%. The main attraction of the climb is the terraced rice fields in Tokakuji and the view back down over Miyakomachi and Yukuhashi.
The first time I cycled through this area I came down a gravel road from Hiraodai and went down the west side of the climb. I remember thinking that it was ridiculously steep and you’d have to be an idiot to want to climb up that road. So obviously I went up it the next weekend.
If you’re going up from the west, the entrance to the climb is next to a stone merchant’s. There’s a small wooden signpost next to the road and a yellow map next to the pavement. If you’re anything like me, you’re going to want to make sure you’re in the small ring because it’s steep pretty much right from the off. A few hundred metres in, the road splits as it runs through the houses; you want to keep to the right. The road bends round to the right then through a couple of switchbacks and goes into the tree line. It keeps going up with no real respite and then you hit another pair of switchbacks – you definitely want to take the outside line on these! Fortunately there’s not much traffic on the road and the bends have mirrors so you can see if there’s anything coming.
There’s a feeling of déjà vu as you go through an almost identical section, at the top of which there’s a break in the trees going into a left-hand bend.
The gradient eases off and if you don’t know the climb you think you’re there. You’re not but as you come through the next left right combo there’s a nice flat section with a bit of a rise visible at the end. You think that if you whack it into the big ring and cane it you’ll be able to coast up that rise.
If you’re a mortal, don’t be tempted to go into the big ring.
That would be a big mistake (which I’ve obviously made). The road rises quite steeply and you think it’s going to level off but in fact it’s just the outside of a bend you can see and the climb keeps going. There’s a house on the left and the the road bends round it so that you go past the driveway at the front but then you’re level with the top of the roof as you go round the back, only to be faced with a sharp, steep right-hander.
Coming along the bottom you think the road crests where the driveway starts……but it doesn’t. (It’s steeper than it looks!)
That section is only about 300 metres long but it averages about 16%. Fortunately, I was using flat pedals the time I tried it in the big ring, and even the next time I was probably fortunate not to snap my rear mech by frantically changing down while putting down as much power as I could to keep moving forward. Now I try to hit it in my lowest gear and spin like a loon at the bottom and then grind for all I’m worth when gravity takes over.
Anyway, the gradient eases off a bit but it’s still about 9% as you pass the entrance to Hakusantaga Shrine on your right. 100 metres or so further on you pass another entrance to the shrine, the road starts to curve to the left, you come out into a clearing and you’re there!
The road curves down to the right and there’s a gravel road which leads up to Hiraodai.
Gravel road to HiraodaiHiraodai in the background
Stay on the main road and it’s a nice 800m downhill into Tokakuji.
Tokakuji at sunrise, looking down over Yukuhashi.
Looking back up over the rice terraces.
Coming from the east, the road leading up to Tokakuji is signposted with a yellow map and a sign for the retirement home. The road climbs up past the Yamaguchi Dam and it’s a steadyish 7% to 8% for the first 2 kilometres. You’re soon into the trees and it’s much easier to find a rhythm going up this side. As you come out of the trees and into the bottom of the rice terraces, the gradient drops off and it’s a pleasant spin up through the hamlet. It picks up again as you head back into the trees for 800 metres to the top, but it’s nothing like as steep as coming up the other side.
And that’s about it. It’s definitely a climb worth doing if you’re in the area and it leads nicely into the Miyako Pass on Route 64, the Ajimi Pass at the other end of Route 64, or Hiraodai as part of a route.
Much of the Keichiku area is a series of valleys radiating out from Mt Hiko. Route 237 follows one of these valleys, becoming route 32 on the way, and then winding over the Hokotate Pass to join up with Route 496 for the final climb up to Mt Hiko. The road follows the Kiigawa (River Kii) until the final 2.5 km or so (there’s a small forest road that carries on along the river) after which winds its way up to a tunnel at the Hokotate Pass.
If you start the climb from the turn off from route 58, it’s 20.4 km. For the first kilometre the road runs almost flat through the rice fields on an alluvial plain, then after you pass under the Higashi Kyushu Express Way, you head into a gently narrowing valley. There’s a Daily Store on the right after about 1.7 kilometres, and that’s essentially the last shop for about 50 kilometres if you need to buy food.
For the next 10 or so kilometres the road is a gentle 2-3% through typical Kyushu countryside. About 11 kilometres in there’s a mildly creepy collection of scarecrow children to look out for.
Scarecrow kids on bikes
As the valley starts to narrow the gradient starts to increase a bit to about 5%, and the climb proper starts after Route 237 merges with Route 32. From here it’s an average of 7.3% for the final 4.2 kilometres. The road also narrows from here becoming single track, although the only traffic you’re likely to encounter is the occasional kei truck or more likely a few deer or wild boar. About half a kilometre after the route 32 junction, with the road hugging the left side of the valley, the rice fields give way to forest on both sides. If you’re in need of a drink, there’s a campsite and farmers’ market (I’ve never seen it open but there are vending machines for drinks) on the right.
After you pass the campsite there’s a hairpin over the river and on the left there’s a marker telling you you’re at bend number 1; the top of the pass is just after bend 25 (the last sign is bend 23). The rest of the climb is fairly typical for the area – twisty, mixed gradients, white guardrail on one side and rock face (mainly concrete) on the other. After heavy rain, there’s a good chance of chunks of rock up to about fist-size littering the road, and from November to April there’s a covering of leaves, pine needles and branches. The road can also be unpassable due to snow from December to the end of February, but it’s usually only for a few days at a time.
For the most part you are hemmed in by the trees on one side and the mountain on the other but there are a few places where the trees on the guardrail side have been felled and there’s some nice views of the surrounding peaks. With almost no traffic the only noise is the occasional bird or deer call and the sound of your own breathing / wheezing / heart exploding through your ears / badly set-up gears – delete as appropriate.
Rare chance of a view back down the climb.A flatter section but you can just make out part of the road up in the bottom right
As you get to the pass there’s a set of three hairpins then the road flattens out to the (short) tunnel that takes you through from Chikujo machi into Miyako machi. Once through the tunnel it’s a similalry windy road down to Route 496, where you have the choice to climb up to Mt Hiko, hop across to the Saigawa Forest Road, or head back down to civilisation.
When I first started cycling, this was my first “big” target. I ended up doing a couple of bigger climbs before this one and climbing it from the other side first, but this was the climb that I started cycling for. It’s still one of my favourite climbs, especially on dark winter mornings when it’s still going to be dark on the way down.
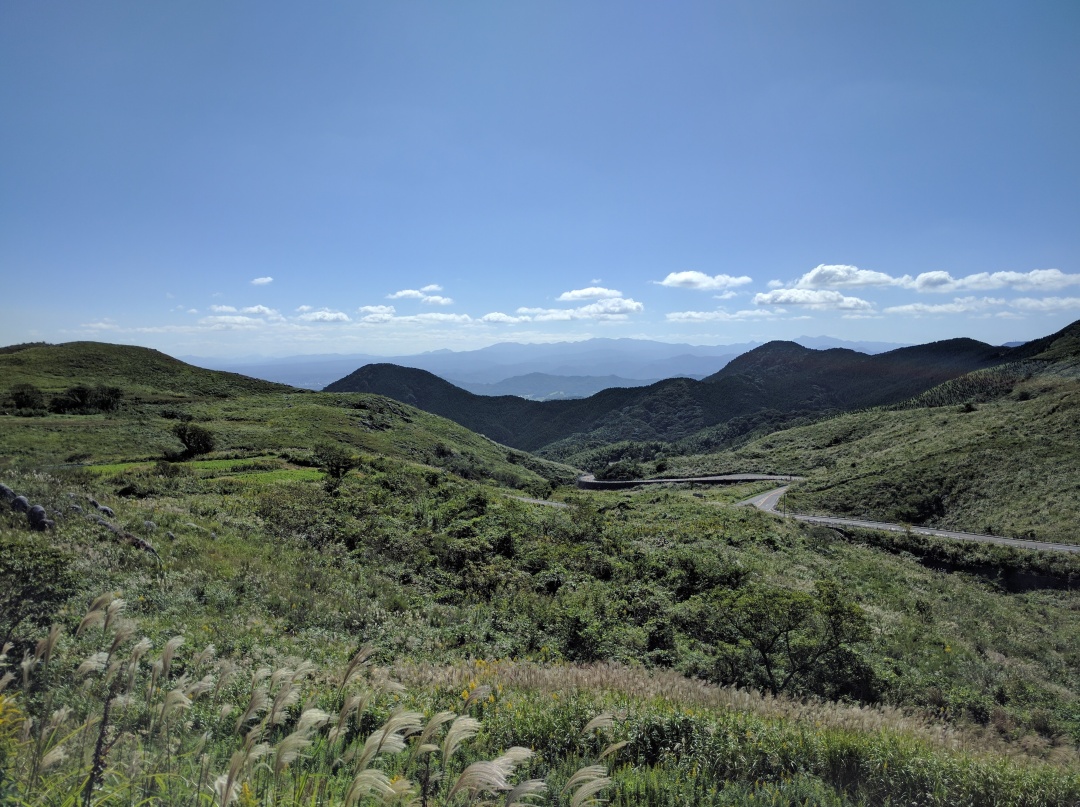
The climb takes you up to the Hiraodai Karst Plateau, a quasi-national park of grassland, limestone “sheep” and caves. There’s also a couple of campsites, a great park and a massive limestone quarry. Hiraodai isn’t really that big an area but it makes up for it with its beauty. It’s not on the scale of Akiyoshidai, but it’s a refreshing change of scene and you can lie back and feel like you’re back in England (if that’s where you’re from and you’re in that kind of mood).
The climb itself is two lanes all the way up and features a number of speed-bumps in various sections (as far as I know they were put in to deter drifting after a few fatal crashes). This makes it less popular with motorbikes than the bump-free climb from the Kitakyushu side, but they are a bit of a pain in the arse for cyclists, too, forcing you over to the left of the lane or onto the (bumpy) centreline.
The lower part of the climb is nothing special; the road just winds through the trees and there’s the odd patch of concretedsideofmountain for your viewing pleasure. The best part of this climb is the last 2 kilometres. The road cuts across the valley, up through the trees and then there’s a beautiful set of cambered bends and viaducts up to the top.
Just before the “peak” there’s a junction – left takes you up to the main campsite and park.
Looking back down from the countryside park.
If you keep going straight, there’s a car park on right which leads on to a track with great views back over Yukuhashi and the sea.
Early morning looking back over Yukuhashi.
Stay on the main road and you go over a few lumps and on to the visitors’ centre where there are a few vending machines for drinks and ice cream if you’re in need of quick energy top-up. Across route 28 from the visitors’ centre there is a road leading up to the caves, another campsite, and a selection of trails that lead over the mountains.
Route 28 – looking down into one of the many sinkholes.Hiraodai side roadHiraodai side roadSide road looking down over Yukuhashi
Stay on Route 28 and there’s the road down to Kitakyushu or you can turn left just before the descent and loop up past the park and back down the way you came.
This is one of the few climbs in the area that gives you a unobstructed view (well, 180 °) from the top. Route 231 follows the Shinnyoji River valley up past its source before finishing at the abandoned Ryujoin Camping Ground. From the start of Route 231 at the junction of Route 10 it’s 12 kilometres to the summit, but Route 10 is a horrible road to cycle on so you’re better starting the climb from the junction with Route 58 (11.5 kilometres to the summit) or the Keichiku Agri Line (9.1 kilometres to the summit).
For the first few kilometres the road is two lanes and relatively flat, but the last 6 kilometres are single track and average about 8%. There’s not usually much traffic,but if you do meet a car, one of you (you) is going to have to stop. There are a few places where the road splits and runs on both sides of the valley – I prefer the right side (as you’re going up). The lower part of the climb runs along the side of the valley with rice fields on your left and tall trees to your right. In some places you’ll see clusters of small logs covered with black netting where they are growing shiitake mushrooms. One of the things I love about cycling up the valleys is that they have retained the old stone walls along the sides of the road and in the stepped rice fields. It’s a refreshing change from the concrete in much of the rest of Japan.
The two sides of the road rejoin in a small hamlet at the top of the valley, and from then on the road is very windy and the road surface isn’t the best; on the steepest parts I find I have to stay seated to get any traction. You pass a small dam and the road disappears into woodland. You grind onwards to a series of short, steep switchbacks that’ll have you searching for a lower gear that you don’t have / hoping you haven’t ruined your rear wheel if your limit screw wasn’t set properly (and leave you wondering why your segment time and moving time are a minute or so out until you realise that you were going so slowly that the GPS autopaused) but grateful that there’s no traffic so you can use the full “width” of the road to take the outside line round the left-hand switchbacks.
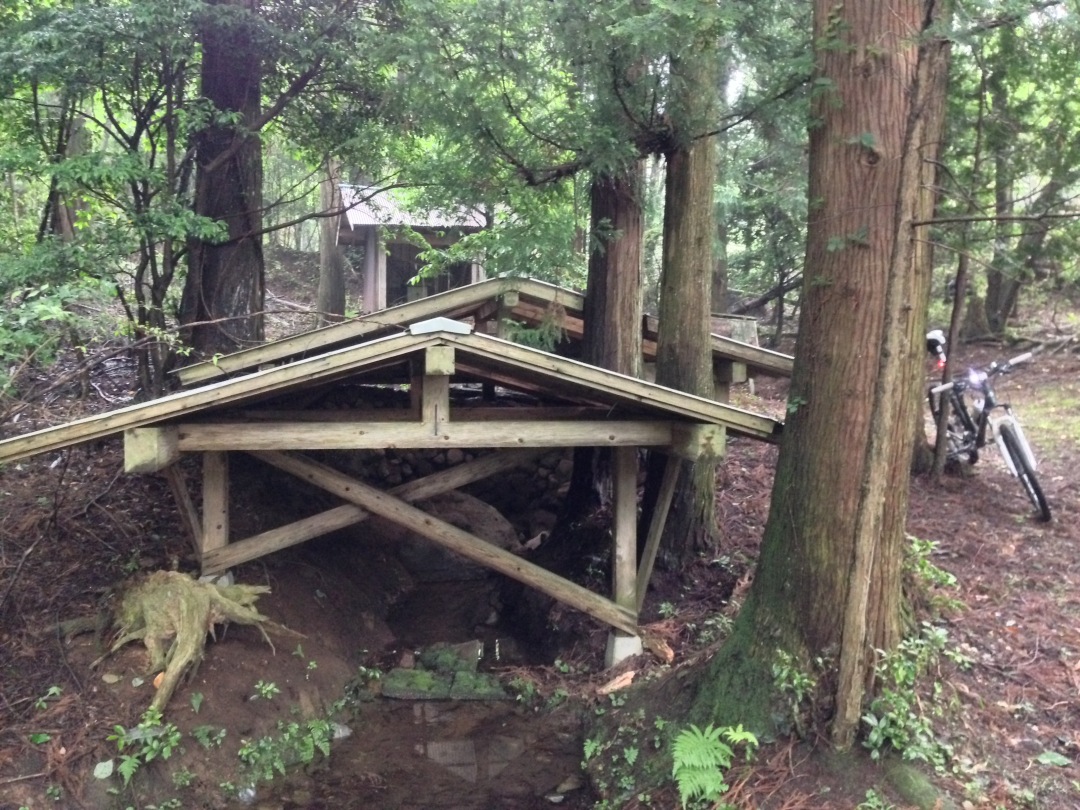
Keep at it and as you come round the last of the switchbacks there’s a footpath leading off on the right after which the gradient eases off and it’s a more gentle climb into the campsite. On the left, just into the trees, there’s a small shrine that marks the source of the river.
Water shrineShinnyoji River source
Keep going past the abandoned cabins and at the junction keep going up. There’s another big map at the end of the road and the trail to the summit leads off from here. Another few hundred metres and you’re at the top.
Mt Kunimi summit.Sunrise, January 1st 2017January 1st 2017May 2016
Going back down there’s the choice of the way you came, or if you turn left at the junction in the campsite, you can go back down via a logging road. The logging road is wider with a generally better surface but has a number of short sharp climbs.